Instalando Yii 2

Yii2 es un framework de desarrollo que me ha gustado utilizar para programar en PHP, tiene dos versiones, la versión básica y la versión más completa donde se tiene la parte pública y la parte administrativa. En este post sólo explicaré cómo instalar la versión básica.

Yii tiene varias formas de instalarse aunque la recomendada es la siguiente, para lo cuál deberemos tener instalado Composer.

En el siguiente post indico como instalarlo:

Composer: herramienta para administrar dependencias en PHP

Una vez que tenemos instalado Composer, nos moveremos al directorio donde trabajaremos el proyecto, ya sea el directorio htdocs de Apache o el public_html de una cuenta de usuario o un directorio donde se configuró un Virtual Host. Para este ejemplo yo lo realizaré en el directorio public_html de mi cuenta.

Para ello nos moveremos a la carpeta:

javoaxian@vaiolinuxmintjx $ cd $HOME/public_html

Ahora ejecutamos la instalación del proyecto el cual lo llamaré: proyectoyii:

javoaxian@vaiolinuxmintjx $ composer create-project --prefer-dist yiisoft/yii2-app-basic proyectoyii

Puede que nos mandé algunos mensajes de error como el siguiente que a mi me mostró, en el cuál se especifica que me falta una configuración hecha en PHP para que Yii2 trabaje correctamente:

Installing yiisoft/yii2-app-basic (2.0.13)
  - Installing yiisoft/yii2-app-basic (2.0.13): Loading from cache
Created project in proyectoyii
Loading composer repositories with package information
Updating dependencies (including require-dev)
Your requirements could not be resolved to an installable set of packages.

  Problem 1
    - yiisoft/yii2 2.0.9 requires ext-mbstring * -> the requested PHP extension mbstring is missing from your system.
    - yiisoft/yii2 2.0.8 requires ext-mbstring * -> the requested PHP extension mbstring is missing from your system.
    - yiisoft/yii2 2.0.7 requires ext-mbstring * -> the requested PHP extension mbstring is missing from your system.
    - yiisoft/yii2 2.0.6 requires ext-mbstring * -> the requested PHP extension mbstring is missing from your system.
    - yiisoft/yii2 2.0.5 requires ext-mbstring * -> the requested PHP extension mbstring is missing from your system.
    - yiisoft/yii2 2.0.13.1 requires ext-mbstring * -> the requested PHP extension mbstring is missing from your system.
    - yiisoft/yii2 2.0.13 requires ext-mbstring * -> the requested PHP extension mbstring is missing from your system.
    - yiisoft/yii2 2.0.12 requires ext-mbstring * -> the requested PHP extension mbstring is missing from your system.
    - yiisoft/yii2 2.0.11.2 requires ext-mbstring * -> the requested PHP extension mbstring is missing from your system.
    - yiisoft/yii2 2.0.11.1 requires ext-mbstring * -> the requested PHP extension mbstring is missing from your system.
    - yiisoft/yii2 2.0.11 requires ext-mbstring * -> the requested PHP extension mbstring is missing from your system.
    - yiisoft/yii2 2.0.10 requires ext-mbstring * -> the requested PHP extension mbstring is missing from your system.
    - Installation request for yiisoft/yii2 ~2.0.5 -> satisfiable by yiisoft/yii2[2.0.10, 2.0.11, 2.0.11.1, 2.0.11.2, 2.0.12, 2.0.13, 2.0.13.1, 2.0.5, 2.0.6, 2.0.7, 2.0.8, 2.0.9].

  To enable extensions, verify that they are enabled in your .ini files:
    - /usr/local/php/lib/php.ini
  You can also run `php --ini` inside terminal to see which files are used by PHP in CLI mode.

Para resolverlo deberemos compilar PHP con la opción –enable-mbstring.

Aquí dejo el post de instalar PHP, sólo hay que agregar en el comando configure poner la opción –enable-mbstring.

Aquí dejo un ejemplo:

./configure --prefix=/usr/local/php --with-apxs2=/usr/local/apache/bin/apxs --with-pdo-mysql --with-openssl --with-zlib --enable-mbstring

Una vez compilado de esta manera PHP, se nos indicará que fue creado correctamente nuestro proyecto:

Installing yiisoft/yii2-app-basic (2.0.13)
  - Installing yiisoft/yii2-app-basic (2.0.13): Loading from cache
Created project in proyectoyii
Loading composer repositories with package information
Updating dependencies (including require-dev)
Package operations: 60 installs, 0 updates, 0 removals
  - Installing yiisoft/yii2-composer (2.0.5): Loading from cache
  - Installing swiftmailer/swiftmailer (v5.4.8): Loading from cache
  - Installing bower-asset/jquery (3.2.1): Loading from cache
  - Installing bower-asset/yii2-pjax (2.0.7.1): Loading from cache
  - Installing bower-asset/punycode (v1.3.2): Loading from cache
  - Installing cebe/markdown (1.1.2): Loading from cache
  - Installing ezyang/htmlpurifier (v4.9.3): Loading from cache
  - Installing bower-asset/inputmask (3.3.11): Loading from cache
  - Installing yiisoft/yii2 (2.0.13.1): Loading from cache
  - Installing yiisoft/yii2-swiftmailer (2.0.7): Loading from cache
  - Installing bower-asset/bootstrap (v3.3.7): Loading from cache
  - Installing yiisoft/yii2-bootstrap (2.0.7): Loading from cache
  - Installing yiisoft/yii2-debug (2.0.13): Loading from cache
  - Installing bower-asset/typeahead.js (v0.11.1): Loading from cache
  - Installing phpspec/php-diff (v1.1.0): Loading from cache
  - Installing yiisoft/yii2-gii (2.0.6): Loading from cache
  - Installing fzaninotto/faker (v1.7.1): Loading from cache
  - Installing yiisoft/yii2-faker (2.0.3): Loading from cache
  - Installing sebastian/diff (2.0.1): Loading from cache
  - Installing sebastian/recursion-context (3.0.0): Loading from cache
  - Installing sebastian/exporter (3.1.0): Loading from cache
  - Installing sebastian/comparator (2.1.2): Downloading (100%)         
  - Installing behat/gherkin (v4.4.5): Loading from cache
  - Installing symfony/polyfill-mbstring (v1.6.0): Loading from cache
  - Installing symfony/dom-crawler (v4.0.3): Loading from cache
  - Installing symfony/css-selector (v4.0.3): Loading from cache
  - Installing symfony/browser-kit (v4.0.3): Loading from cache
  - Installing symfony/yaml (v4.0.3): Loading from cache
  - Installing symfony/event-dispatcher (v4.0.3): Loading from cache
  - Installing symfony/console (v4.0.3): Loading from cache
  - Installing symfony/finder (v4.0.3): Loading from cache
  - Installing psr/http-message (1.0.1): Loading from cache
  - Installing guzzlehttp/psr7 (1.4.2): Loading from cache
  - Installing doctrine/instantiator (1.1.0): Loading from cache
  - Installing phpunit/php-text-template (1.2.1): Loading from cache
  - Installing phpunit/phpunit-mock-objects (4.0.4): Loading from cache
  - Installing theseer/tokenizer (1.1.0): Loading from cache
  - Installing sebastian/version (2.0.1): Loading from cache
  - Installing sebastian/environment (3.1.0): Loading from cache
  - Installing sebastian/code-unit-reverse-lookup (1.0.1): Loading from cache
  - Installing phpunit/php-token-stream (2.0.2): Loading from cache
  - Installing phpunit/php-file-iterator (1.4.5): Loading from cache
  - Installing phpunit/php-code-coverage (5.3.0): Loading from cache
  - Installing sebastian/resource-operations (1.0.0): Loading from cache
  - Installing sebastian/object-reflector (1.1.1): Loading from cache
  - Installing sebastian/object-enumerator (3.0.3): Loading from cache
  - Installing sebastian/global-state (2.0.0): Loading from cache
  - Installing phpunit/php-timer (1.0.9): Loading from cache
  - Installing webmozart/assert (1.2.0): Loading from cache
  - Installing phpdocumentor/reflection-common (1.0.1): Loading from cache
  - Installing phpdocumentor/type-resolver (0.4.0): Loading from cache
  - Installing phpdocumentor/reflection-docblock (4.2.0): Loading from cache
  - Installing phpspec/prophecy (1.7.3): Loading from cache
  - Installing phar-io/version (1.0.1): Loading from cache
  - Installing phar-io/manifest (1.0.1): Loading from cache
  - Installing myclabs/deep-copy (1.7.0): Loading from cache
  - Installing phpunit/phpunit (6.4.4): Loading from cache
  - Installing codeception/base (2.3.7): Loading from cache
  - Installing codeception/verify (0.3.3): Loading from cache
  - Installing codeception/specify (0.4.6): Loading from cache
symfony/browser-kit suggests installing symfony/process ()
symfony/event-dispatcher suggests installing symfony/dependency-injection ()
symfony/event-dispatcher suggests installing symfony/http-kernel ()
symfony/console suggests installing symfony/lock ()
symfony/console suggests installing symfony/process ()
symfony/console suggests installing psr/log (For using the console logger)
phpunit/phpunit-mock-objects suggests installing ext-soap (*)
phpunit/php-code-coverage suggests installing ext-xdebug (^2.5.5)
sebastian/global-state suggests installing ext-uopz (*)
phpunit/phpunit suggests installing phpunit/php-invoker (^1.1)
phpunit/phpunit suggests installing ext-xdebug (*)
codeception/base suggests installing aws/aws-sdk-php (For using AWS Auth in REST module and Queue module)
codeception/base suggests installing codeception/phpbuiltinserver (Start and stop PHP built-in web server for your tests)
codeception/base suggests installing flow/jsonpath (For using JSONPath in REST module)
codeception/base suggests installing phpseclib/phpseclib (for SFTP option in FTP Module)
codeception/base suggests installing league/factory-muffin (For DataFactory module)
codeception/base suggests installing league/factory-muffin-faker (For Faker support in DataFactory module)
codeception/base suggests installing symfony/phpunit-bridge (For phpunit-bridge support)
codeception/base suggests installing stecman/symfony-console-completion (For BASH autocompletion)
Writing lock file
Generating autoload files
> yii\composer\Installer::postCreateProject
chmod('runtime', 0777)...done.
chmod('web/assets', 0777)...done.
chmod('yii', 0755)...done.
> yii\composer\Installer::postInstall

Ahora desde nuestro navegador podremos entrar ya a nuestro proyecto con Yii2. Cabe recordar que este proyecto lo coloqué en el directorio public_html de mi cuenta de usuario, por lo que ingresaré de la siguiente forma en el navegador:

http://localhost/~javoaxian/proyectoyii/web/index.php

se nos mostrará la siguiente pantalla:

jx_post_1104_01

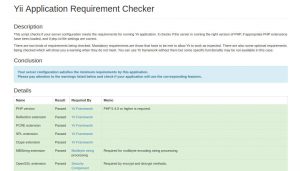
Existe un archivo de requerimientos mínimos de Yii2, para ingresar a él:

http://localhost/~javoaxian/proyectoyii/requirements.php

se nos mostrará la siguiente pantalla:

jx_post_1104_02

Con esto ya tenemos nuestro primer proyecto de Yii2, ahora será cuestión de empezar a desarrollar en él.

Composer: herramienta para administrar dependencias en PHP

Composer es una herramienta que nos sirve para administración de dependencias en PHP. Permite declarar las bibliotecas que se usan en nuestro proyecto y a su vez nos permite instalarlas y administrarlas.

Para instalarlo ejecutamos lo siguiente:

javoaxian@vboxlinuxmintjx $sudo su -
root@vboxlinuxmintjx # curl -sS https://getcomposer.org/installer | php

Y si obtenemos el siguiente error:

Some settings on your machine make Composer unable to work properly.
Make sure that you fix the issues listed below and run this script again:

The openssl extension is missing, which means that secure HTTPS transfers are impossible.
If possible you should enable it or recompile php with --with-openssl

Para resolverlo deberemos compilar PHP con la opción  –with-openssl.

Si obtenemos el siguiente error:

Downloading...

Composer (version 1.6.2) successfully installed to: /home/javoaxian/composer.phar
Use it: php composer.phar

Some settings on your machine may cause stability issues with Composer.
If you encounter issues, try to change the following:

The zlib extension is not loaded, this can slow down Composer a lot.
If possible, install it or recompile php with --with-zlib

The php.ini used by your command-line PHP is: /usr/local/php/lib/php.ini
If you can not modify the ini file, you can also run `php -d option=value` to modify ini values on the fly. You can use -d multiple times.

Para resolverlo deberemos compilar PHP con la opción  –with-zlib.

Aquí dejo el post de instalar PHP, sólo hay que agregar en el comando configure poner las opciones –with-openssl –with-zlib.

Aquí dejo un ejemplo:

./configure --prefix=/usr/local/php --with-apxs2=/usr/local/apache/bin/apxs --with-pdo-mysql --with-openssl --with-zlib

Si por fin descargó correctamente se nos mostrará el siguiente mensaje:

All settings correct for using Composer
Downloading...
Composer (version 1.6.2) successfully installed to: /home/javoaxian/composer.phar

Use it: php composer.phar

Ahora movemos el archivo composer.phar al directorio /usr/local/bin.

root@vboxlinuxmintjx # mv composer.phar /usr/local/bin/composer

Y con eso tendremos instalado Composer.

Configure: error: Cannot find OpenSSL’s

Si al momento de compilar PHP al habilitar la opción –with-openssl manda el siguiente error:

configure: error: Cannot find OpenSSL's

Para resolver este error instalamos el siguiente paquete:

javoaxian@vboxlinuxmintjx $ sudo su -
root@vboxlinuxmintjx # apt-get install libssl-dev

Configurar PHP para conectarse a SQL Server

En este post voy a explicar la manera que me funcionó para poder configurar PHP para que se pueda conectar a SQL Server 2017.

Para poder realizar esta configuración, estaré en el supuesto que ya se tiene instalado lo siguiente:

Ya teniendo instalado todo ésto, vamos a proceder a ejecutar lo siguiente para la configuración.

Para comenzar nos convertiremos en usuario root.

javoaxian@vboxlinuxmintjx $ sudo su -

Ya como root, realizamos lo siguiente:

root@vboxlinuxmintjx # pear config-set php_ini `php --ini | grep "Loaded Configuration" | sed -e "s|.*:\s*||"` system
root@vboxlinuxmintjx ~ # pecl install sqlsrv

Si obtenemos el siguiente error:

Cannot find autoconf. Please check your autoconf installation and the
$PHP_AUTOCONF environment variable. Then, rerun this script.

Instalamos el siguiente paquete para corregirlo:

root@vboxlinuxmintjx # apt-get install autoconf

Continuamos con la instalación y si ahora obtenemos el siguiente error:

root@vboxlinuxmintjx # checking whether we are using the GNU C++ compiler... no
checking whether g++ accepts -g... no
checking how to run the C++ preprocessor... /lib/cpp
configure: error: in `/tmp/pear/temp/pear-build-rootTlVXJL/sqlsrv-4.3.0':
configure: error: C++ preprocessor "/lib/cpp" fails sanity check
See `config.log' for more details
ERROR: `/tmp/pear/temp/sqlsrv/configure --with-php-config=/usr/local/php/bin/php-config' failed

Instalamos el siguiente paquete para corregirlo:

root@vboxlinuxmintjx # apt-get install g++

Continuamos con la instalación y si ahora ya se instaló correctamente mandándonos el siguiente mensaje:

Build process completed successfully
Installing '/usr/local/php/lib/php/extensions/no-debug-zts-20170718/sqlsrv.so'
install ok: channel://pecl.php.net/sqlsrv-4.3.0
Extension sqlsrv enabled in php.ini

Entonces continuamos con la instalación del siguiente paquete:

root@vboxlinuxmintjx # pecl install pdo_sqlsrv

Una vez instalado correctamente se muestra el siguiente mensaje:

Build process completed successfully
Installing '/usr/local/php/lib/php/extensions/no-debug-zts-20170718/pdo_sqlsrv.so'
install ok: channel://pecl.php.net/pdo_sqlsrv-4.3.0
Extension pdo_sqlsrv enabled in php.ini

Esta instalación agregó las siguientes líneas en el archivo php.ini y si no las colocó, entonces hay que agregarlas:

extension="pdo_sqlsrv.so"
extension="sqlsrv.so"

Ahora reiniciamos el servidor Apache:

root@vboxlinuxmintjx # apachectl restart

Ahora podemos crear un archivo con la siguiente línea. En mi caso creé el archivo phpinfo.php en el directorio /usr/local/apache/htdocs:

<?php phpinfo(); ?>

Al ejecutar el archivo, nos mostrará la configuración y ahí podremos ver que ya se encuentra la extensión PDO de SQL Server la cual se llama pdo_sqlsrv.

jx_post_1057_01

Con esto ya tenemos configurado nuestro PHP para conectar con SQL Server.

Aquí dejo un archivo que obtuve de este artículo para que puedan comprobar la conexión a la base de datos, sólo se deberán cambiar los parámetros para conectarse a la base de datos. Sólo hay que quitar las extensión .txt para ejecutarlo.

Instalar PHP desde fuentes en GNU/Linux habilitando PDO para conexión a base de datos

En mi otro blog había hecho el post:

Instalar PHP desde fuentes en GNU/Linux

Este post no difiere mucho del que hice en el otro blog, sólo que se muestra como compilar PHP para poder usar las funciones de conexión y manejo de base de datos de la extensión PDO, la cual es la que ya a partir de hace algunos años, es la manera en que se debe conectar y manera la base de datos.

Antes que nada deberemos tener instalado ya Apache, aquí dejo este artículo actualizado para su instalación.

También deberemos descargar PHP.

php-7.2.1.tar.bz2

Ya instalado el servidor web y descargado los fuentes de PHP, vamos a realizar los siguientes pasos:

Para este post, tomaré de ejemplo MySQL

Para comenzar nos convertiremos en usuario root.

javoaxian@vboxlinuxmintjx $ sudo su -

Siguiente:

root@vboxlinuxmintjx $ cp /ruta/donde se descargo/php-7.2.1.tar.bz2 /usr/local/src/
root@vboxlinuxmintjx $ cd /usr/local/src/
root@vboxlinuxmintjx $ tar -jxvf php-7.2.1.tar.bz2
root@vboxlinuxmintjx $ cd php-7.2.1/
root@vboxlinuxmintjx $ ./configure --prefix=/usr/local/php --with-apxs2=/usr/local/apache/bin/apxs --with-pdo-mysql

Si nos manda el siguiente error:

checking whether to enable LIBXML support... yes
checking libxml2 install dir... no
checking for xml2-config path...
configure: error: xml2-config not found. Please check your libxml2 installation.

Instalamos el siguiente paquete pare resolver el error:

root@vboxlinuxmintjx $ apt-get install libxml2-dev

Instalado el paquete anterior, continuamos con la instalación.

root@vboxlinuxmintjx $ make
root@vboxlinuxmintjx $ make install

Una vez terminada la compilación e instalación, deberemos copiar el archivo php.ini al directorio de instalación. Se nos proporcionan 2 archivo el php.ini-development y php.ini-production, yo utilizaré el primero para este ejemplo ya que lo utilizo más para desarrollo y prefiero su configuración para este fin.

root@vboxlinuxmintjx $ cp php.ini-development /usr/local/php/lib/php.ini

Ahora deberemos editar el archivo httpd.conf de apache, el cual en este ejemplo se encuentra en el directorio /usr/local/apache/conf/. En dicho archivo deberemos buscar las siguientes líneas:

 #
# AddType allows you to add to or override the MIME configuration
# file specified in TypesConfig for specific file types.
#
#AddType application/x-gzip .tgz

Y arriba de éstas agregaremos las líneas respectivas de PHP para que nos quede esa sección de esta forma:

 #PHP
AddType application/x-httpd-php .php .html .phtml .php3 .php4 .php5. .php7 .htm
AddType application/x-httpd-php-source .phps
#
# AddType allows you to add to or override the MIME configuration
# file specified in TypesConfig for specific file types.
#
#AddType application/x-gzip .tgz

Aquí le estamos indicando a Apache que los archivos con extensiones .php .html .phtml .php3 .php4 .php5 .php7 .htm pueden interpretar el código de PHP.

También buscaremos las siguientes líneas:

<IfModule dir_module>
    DirectoryIndex index.html
</IfModule>

Y agregaremos el archivo index.php para que sea interpretado como archivo principal.

<IfModule dir_module>
    DirectoryIndex index.html index.php
</IfModule>

Si tienen el proceso de apache funcionando, deberán darlo de baja:

root@vboxlinuxmintjx $ /usr/local/apache/bin/apachectl stop

Y ahora deberán levantarlo:

root@vboxlinuxmintjx $ /usr/local/apache/bin/apachectl start

Ahora apache ya puede interpretar nuestras páginas con código de PHP.

Si queremos probar que esté funcionando Apache con PHP, podemos poner un archivo llamado phpinfo.php dentro del directorio /usr/local/apache/htdocs/ (solo el usuario root puede escribir en este directorio para fines de este ejemplo) y agregarle la siguiente línea:

<?php phpinfo(); ?>

Ahora en nuestra navegador ingresamos a la siguiente dirección: http://localhost/phpinfo.php

Recuerda que si tu Apache está corriendo en otro puerto, como por ejemplo el 8080, deberás ingresar de la siguiente manera desde el navegador: http://localhost:8080/phpinfo.php

Donde nos aparecerá algo como ésto:

jx_post_1044_01

Dentro de esa misma pantalla, podemos buscar que ya está habilitado PDO para MySQL.

jx_post_1044_02

En mi caso me gusta agregar la ruta de las herramientas en el PATH de todos los usuarios, para ello hay que editar el archivo como usuario root:

/etc/profile

y agregamos las siguientes líneas:

export PHP=/usr/local/php
export PATH=$PATH:$PHP/bin

Con esto concluimos la configuración.

PhpStorm: IDE de desarrollo para programar en PHP

PhpStorm es un interesante IDE de desarrollo para PHP el cual he empezado a utilizar. Desde hace mucho utilizo a Eclipse como IDE, pero decidí probar esta alternativa debido a que desarrollando en Android y hacer el paso de Eclipse a Android Studio noté varias cosas que me agradaron.

Encontré que debido a que estaba basado en IntelliJ la misma empresa tiene varios IDE’s para desarrollar, entre ellos PhpStorm. Estoy trabajando un proyecto junto con Yii2 y va bastante bien. Seguramente estaré publicando algunas cosas más de este IDE.

Sitio: https://www.jetbrains.com/phpstorm/

Descarga: https://www.jetbrains.com/phpstorm/download/

Gratuito: No.

Captura de pantalla:


jx_post_871_02